Pohľadnice, ktoré nikto nevyhodí

Pohľadnice, ktoré nikto nevyhodí
Ľudia milujú čipky. Paličkovať vie tak málo ľudí, že okolie od nás očakáva, že darčeky sami vyrobíme. Pohľadnica s čipkou je nádherná, reprezentatívna a vhodná ako darček pri každej príležitosti.
V tomto článku ti ukážem ako takúto pohľadnicu urobiť s použitím mojich vzorov, čo všetko budeš potrebovať a poskytnem ti praktické tipy na tvorbu vlastných unikátnych dekorácií.
Akú pohľadnicu zvoliť?
Čipku môžeš pripevniť na bielu alebo farebnú pohľadnicu.
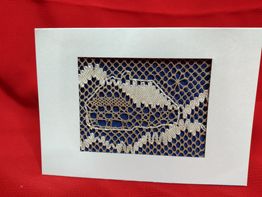
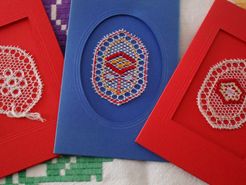
A. Farebná pohľadnica: pohľadnice sú zvyčajne červené, zelené, modré, či žlté s otvorom v strede alebo bez otvoru. Čipku zvoľ v bielej farbe, aby na farebnom podklade vynikla. Pri svetlých pohľadniciach môžeš vybrať aj farebné nite.
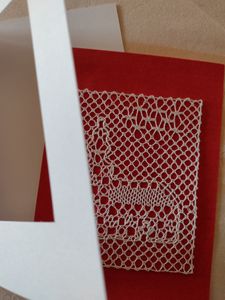
B. Biela pohľadnica s okienkom (3 dielna): 3 dielne sady, kde je otváracia časť, papier v strede a obálka, je pre čipku ako stvorená. Takáto pohľadnica slúži zároveň ako pasparta, lebo čipku ohraničí na okrajoch. Papier v strede môžeš namaľovať, nalepiť naň farebný kontrastný papier alebo látku a potom môžeš urobiť bielu čipku.
Ak použiješ farebné nite, pohľadnicu môžeš ponechať v bielej farbe.
Aj predná strana sa dá namaľovať, prípadne inak dozdobiť.
Ako postupovať?
1. Výber pohľadnice: pred tým ako začneš robiť čipku, už musíš mať pohľadnicu. Ak je s výsekom, je nutné ho zmerať a priložiť nákres čipky, či veľkosť hotového výrobku bude vhodná k rozmerom okienka (výseku).
2. Príprava vzoru na paličkovanie: Ak je vzor väčší alebo naopak veľmi malý, je nutné zmeniť jeho veľkosť. Moje vzory sú v rámčeku, ktorý má uvedený rozmer. Väčšina výsekov na pohľadniciach A6 má 6,3 – 8 cm. Do výsekov sa hodia tie, ktoré sú v rámčeku 8 x 8 cm a menej. Niektoré vzory teda potrebuješ zmenšiť. Urobíš to tak, že pri tlačení vzoru z PDF zvolíš Vlastná mierka a napíšeš do rámčeka percentá (%). Ak je rám 9 x 9 cm, zmenši ho na 85-90 %, pri rámčeku 10 x 10 cm 75-80 %. Pokiaľ nákres zmenšuješ, je nutné tomu aj prispôsobiť silu (hrúbku) nite. Napríklad, ak na vzore je odporúčaná niť 8-10 a zmenšíš ho na 75-80 % potrebuješ niť hrúbky 30-40, pri uvádzanej hrúbke 20-30 potrebuješ 50-60/100. Ak ho zmeníš ešte viac, tak hrúbku 50 -100. Pri niektorých vzoroch už je vzor prispôsobený pohľadnici, vtedy je potrebné ho vytlačiť v mierke 100%. Pokiaľ má byť čipka väčšia ako výsek, má ho zo zadnej strany prekrývať. Nechaj dostatočne široké okraje, ktoré sa skryjú za papier.
3. Výber a príprava vhodných nití: podľa farby pohľadnice a zadnej strany vyber vhodnú farbu nití. Na pohľadnicu sa hodia menšie vzory, pri ktorých je aj spotreba nití menšia, preto nie je nutné navinúť si metre nití na paličky.
4. Zhotovenie čipky: urob čipku s vhodnými niťami a vo vhodnej veľkosti. Dbaj na zakončenie nití v skrytých častiach, aby nebolo vidno uzlíky. Hotovú čipku môžeš tužiť, ale pri niektorých vzoroch ju stačí iba prežehliť cez biele plátno. Hotovú čipku vyrovnaj (napríklad prežehlením pri nízkej teplote cez látku, alebo medzi knihami).
5. Dokončenie: v prestávkach v paličkovaní si pri 3-dielnych pohľadniciach priprav zadnú stranu. Môžeš ju namaľovať alebo polepiť. Čipku nalep na príslušnú časť pohľadnice. Použiť môžeš lepidlo na vodnej bázi, sekundové lepidlo (stačí len kvapôčka lepidla). Niektoré vzory sa dajú nalepiť aj pomocou obojstrannej lepiacej pásky alebo lepiacej hmoty. Pri práci buď opatrný/á. Na niektoré povrchy je možné čipku aj prišiť. Lepidlo nanes na hustejšie pletenia a na rohy. Pri 3-dielnych pohľadniciach opatrne nalep dozadu zadnú stranu.
6. Na pohľadnicu napíš text a zabaľ ju do obálky. Obdarovaný/á ju môže zarámovať do bežne dostupného rámu.
Pomôcky:
- Vhodný vzor na paličkovanie a k tomu vhodné nite
- Knihárske plátno, farebný tvrdý papier alebo hrubšia tkanina ako pozadie čipky
- Obojstranná lepiaca páska alebo lepidlo (napr. herkules, lepiace tyčinka a pod.)
- Koráliky, farby, pierka a iné materiály na dotvorenie.
Tipy a triky
1. Vyber si kvalitné materiály: Používaj kvalitné nite, neobávaj sa . Môžeš pridať aj koráliky a prírodniny. Pohľadnice vyberaj z hrubšieho papiera. Ak chceš polepiť zadnú stranu, vyskúšaj si na kúsku kartónu, ako bude materiál vyzerať po nalepení, či neurobí lepidlo fľaky. V takom prípade prilep látku/plátno len v častiach skrytých mimo výsek. Niekedy sa polepený papier skrúti do mierneho oblúka. Vlož ho medzi dve knihy, alebo prežehli na nízkej teplote cez bavlnenú látku. Kvalita materiálov výrazne ovplyvňuje výsledok.
2. Pracuj v dobre vetranom priestore: Niektoré lepidlá a tužidlá môžu mať silný zápach. Práca v dobre vetranom priestore zaručí, že sa vyhneš nepríjemným výparom.
3. Trpezlivosť je kľúčová: Neponáhľaj sa. Daj si čas na dôkladné dokončenie čipky a jej vyhladenie pred pripevnením na papier. Rovnako buď dôkladný/á pri príprave zadnej strany, ktorá musí byť suchá pred prilepením čipky.
Darčekmi s ručne paličkovanou čipkou vždy ohúriš a ver mi, že túto pohľadnicu nevyhodia do koša. Tak neváhaj, vyber si vzor, vhodnú pohľadnicu a nech ti paličky pekne klepocú!
Vhodné vzory do pohľadníc nájdeš vo vzoroch:
- Kolekcia "Senohrad 2020", Senohrad MT
- Čipky zo Španej Doliny: Kvety B1 a E, Srdcia , Hviezdy, Svietnik, guľa a pohľadnica
- Čipka na tylovej sieti: Kraslice v tyle - Pozdrav, Stromček v tyle – Tylové ozdoby, ORBIS PICTUS - Srdce Cor, Fauna Zvieratká, Flora Kvetena